Electret Condenser Microphone Amplifier Circuit
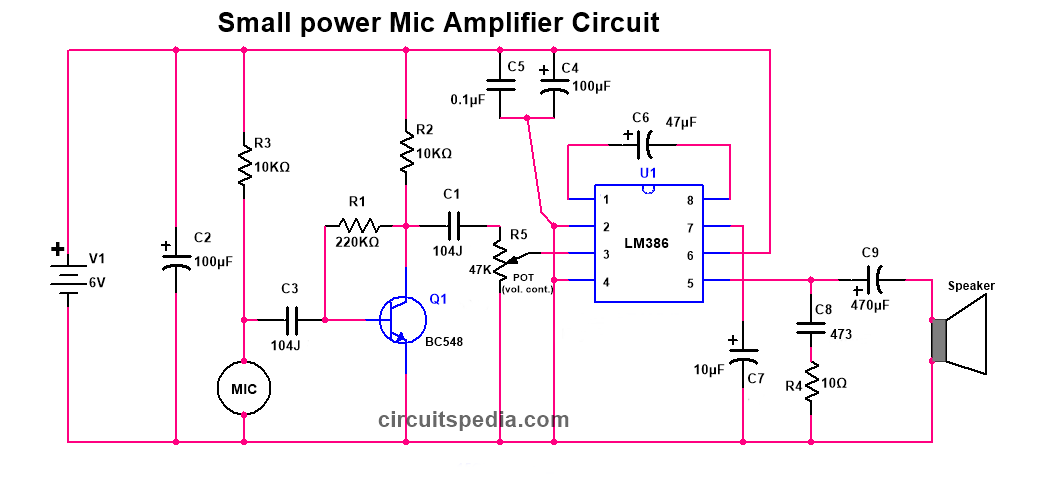
This is another simple circuit diagram of a homemade MIC Speaker Amplifier using the LM386 audio amplifier IC. It is a compact yet powerful amplifier designed for low-power applications. This is one of the best and most interesting circuits for beginners.
In this circuit, a BC548 transistor acts as a preamplifier, which helps reduce noise and provides a clean, high-gain input signal to the LM386 IC. The condenser microphone becomes highly sensitive, allowing it to capture even the smallest voice signals effectively.
This low-power amplifier is suitable for use in small to medium-sized halls, classrooms, homes, and offices when paired with an 8-ohm speaker.
A microphone amplifier circuit is essential for boosting weak audio signals from a mic to a usable level. This simple mic amplifier uses the LM386 audio amplifier IC and a BC548 transistor, making it perfect for DIY audio projects, intercom systems, and voice recorders. This low-power mic amplifier works on a 6V power supply and can drive a small speaker efficiently.
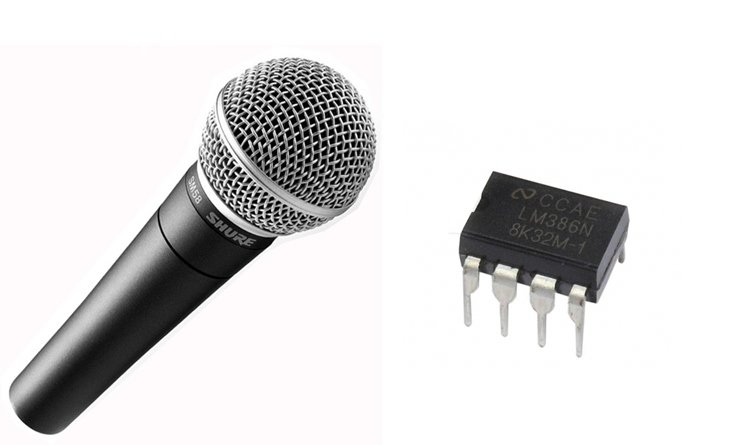
LM386 microphone amplifier
Circuit Explanation
Power Supply (6V DC)
- The circuit is powered by a 6V DC source (V1).
- C2 (100µF capacitor) stabilizes the power supply, filtering unwanted noise.
Microphone Pre-Amplifier Stage (BC548 Transistor)
- The MIC (Condenser Microphone) captures sound waves and converts them into an electrical signal.
- C3 (104J capacitor) removes DC interference from the mic output.
- R1 (220KΩ resistor) provides necessary biasing to the Q1 (BC548 transistor).
- Q1 amplifies the weak mic signal, making it stronger for further processing.
- R3 (10KΩ) & R2 (10KΩ) help in setting the gain of the transistor stage.
- The amplified signal is passed through C1 (104J capacitor) to the next stage.
LM386 Audio Amplifier Stage
- The amplified signal is fed to pin 3 of U1 (LM386 Audio Amplifier IC).
- Pin 2 is grounded while pin 4 is also connected to ground.
- Pin 6 receives the +6V power supply.
- C6 (47µF) capacitor boosts the amplifier gain up to 200 times.
- A potentiometer (POT) (47KΩ) is connected at pin 1 and pin 8 for volume control.
- C5 (0.1µF) and C4 (100µF) help in filtering power supply noise.
Speaker Output Stage
- The amplified signal from pin 5 of LM386 is passed through C7 (10µF capacitor).
- R4 (10Ω resistor) and C8 (473 capacitor) help in reducing high-frequency noise.
- Finally, the signal reaches C9 (470µF capacitor), which couples the signal to the speaker.
Working Principle
- The MIC captures sound and converts it into an electrical signal.
- The BC548 transistor amplifies the weak mic signal.
- The LM386 IC further amplifies the signal and drives the speaker.
- The volume potentiometer allows adjustment of the output sound level.
Key Features & Advantages
✔ Low-power operation (6V battery-friendly).
✔ Uses LM386 IC, a popular audio amplifier.
✔ High gain amplification suitable for mic-based applications.
✔ Portable and easy to build with minimal components.
✔ Noise filtering capacitors for clear audio output.
✔ Adjustable volume control with a 47KΩ potentiometer.
Components
Condenser mic-1
ic LM386-1
Resistor
10k-2
220K-1
10Ω-1
POT – 22k or 47k-1
Capacitor
0.1uf (104j)-2
47nf (473)-1
10uf-2
47uf-1
100uf-2
0.1uf-1
470uf-1
Transistor
BC547-1
Also read
- Stereo Audio Amplifier Circuit Using CD6283
- DIY Fade On Fade Off Circuit: Smooth LED Dimming Using MOSFET & Capacitor
- Comparator



Will this also work with 5vdc? I want to add this to another project already powered by 5vdc and really don’t want another power supply for the project.
bp
yes this will work
what do you mean by ;best’?
the LM386 is a lousy low power amp; high distortion and noise
Good ƅlog post. I absolutely appreciate this site.
Thanks!